
Basic Open Chords for Beginners to Learn
Chords form the backbone and harmony of a piece of music. If you are totally new to playing the guitar, one of the first things to get you acquainted with the instrument is to learn the open chords.
Why start with open chords? Well, they are the simplest forms of chords and can even help you learn to play some easy songs. For a beginner guitarist, this is very important as it not only motivates you to work harder but also gives you a sense of achievement.
First things first, I strongly encourage you to download a copy of Guitar Pro 6. This is one of the best music software ever to be created as it makes learning the guitar so much easier. Guitar Pro 6 also has an embedded function to help you visualize and create chord patterns on the fly.
And the truth is, when I first started out with my guitar, this was an indispensable tool for me. Now, my current students are also having a blast with this awesome software.
Basic Guitar Chord Diagrams
In order to learn how to fret a chord, we must first figure out how to read chord diagrams to get the correct fingering positions. Now, there isn’t a “standardized” form of such diagrams and there are many different variations for denoting guitar chords.
To keep things simple and to limit the scope of this lesson, I am only going to highlight some of the common features you can expect to see. In general, chord diagrams are usually represented in a grid format and the name of the chord is found at the top of the diagram.

- The vertical lines represent each string on the guitar with the leftmost representing the thickest string and the rightmost representing the thinnest string.
- The horizontal lines represent the frets of the guitar.
- The black dot on the diagram shows you where to place your fingers and the number indicates which finger you should use in playing the chord.
- The white dot represents that you should play an open string.
- The X represents a string that should not be sounded while playing the chord. In other words, mute the string when you see the X symbol.

In the chord diagram for A minor above, the index finger is placed at the 1st fret of the second string, the middle finger is placed at the 2nd fret of the 4th string and the ring finger is placed at the 2nd fret of the 3rd string. When the chord is played, only the first 5 strings are played.
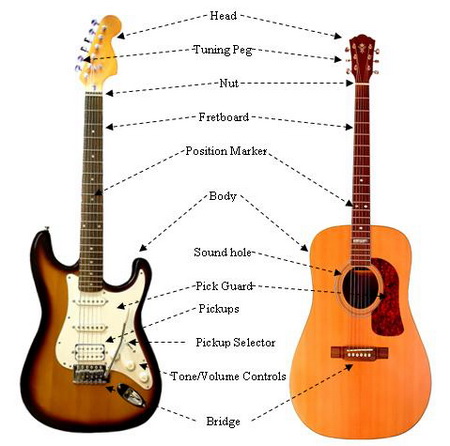
What Are the Basic Open Chords You Can Start With?
Open chords usually contain at least one note with an open string. An open string simply implies that you play the corresponding string without fretting it anywhere. That said, here is a list of major open chords that are also commonly referred to as “CAGED”.
Did you notice that there are some slight differences from the previous chord diagram? If you are observant, you would probably notice that the numbering of the fingers is now found at the bottom of the chord diagram instead of inside the black dots.

I had purposely written these chords in a different style from those commonly found on the net.
Here is a List of the Most Important Open Minor Chords

For this lesson, I want you to concentrate on learning the fingerings for the chords. Don’t worry about the timing or strumming rhythms as I will cover them in the next lesson. For now, I want you to fully focus on getting your fingers used to holding down the strings.
The goal here is to achieve a clean sound for each open chord you play. One way to test this after you had placed all your fingers on the fretboard is to play through each of the strings slowly. Make sure each string rings out cleanly and isn’t muffled or muted.
If there are some notes that are not ringing out properly, find out why. Chances are, you are not pressing hard enough or some parts of your fingers are accidentally touching the string and muting them in the process. Also, you want to be consciously aware that any unused fingers aren’t touching the strings too.
Finger Motor Skills And Chord Changing
Give yourself a pat on the back for coming this far.
The next thing I want you to do is to get your fingers used to changing chords. For new players, you would probably face some difficulties in coordinating your fingers. That’s normal because it takes some time for your body to get used to the fingerings.
Once again, you need to make sure that each chord you play rings out loud and cleanly after you change finger positioning. I know it won’t be easy at first but if you are persistent and put in some effort in practicing, playing open chords would soon be of 2nd nature to you.
If you are interested to learn some theory and background on how chords are formed, you can find them in the guitar chords section of GuitarPlayerWorld.com. In the next lesson, I will show you how to use open chords to form progressions and teach you some basic strumming patterns. See you then.
Everything You Need to Become a Great Guitar Player…

For the most comprehensive step-by-step guitar training program, we highly recommend Gibon’s Learn & Master Guitar course. This award winning DVD course is currently having a 3-day sale and you get to save $100 off the usual price today!
Click here to find out more information and get the course before this promotion ends…
Related Articles


We Recommend…

Leave A Comment
One Comment
My Dad played the guitar all my life and has since passed away. I’ve got both of his guitars and would love to learn to play but I’m left handed.
Do you have a way to teach me?