How to Change And Restring Your Guitar Strings
For a newbie guitar player, restringing your instrument may seem a little intimidating. But with the right tools, a little knowledge and some practice, you’ll be able to restring your guitar like a professional luthier.
Back when I was gigging regularly, I would restring my guitar almost every week and you are probably thinking that this is a little excessive. You see, my body chemistry is a little acidic. The sweat and oils from my hands would make new guitar strings sound dull after a couple of days and also make them feel “dirty” to the touch.
For me, the bright sound and smooth feel of a new set of strings help to inspire my playing. So, it became a ritual for me to restring my electric guitar the night before we had a gig going on. Whatever the reasons, you will have to change your guitar strings in time to come and this lesson will teach you exactly how to do that.

Step By Step Guide to Changing Guitar Strings
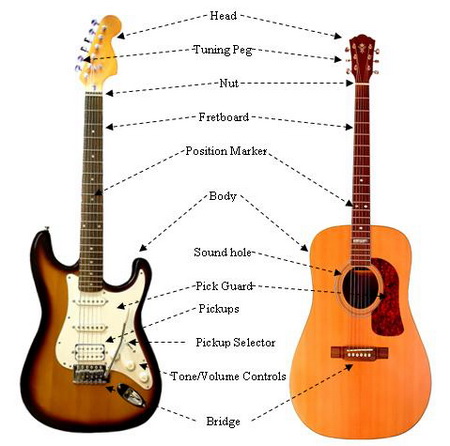
Step 1 – Loosen the strings from the tuning pegs: You can easily loosen the strings with the help of a peg winder or manually wind down the tuning pegs until the strings can be safely removed.
You may choose to either remove the strings one after the other and get it replaced immediately OR you may remove them all at once before stringing them back on again. I personally recommend the latter option as you can make use of the opportunity to clean the fretboard and remove any grime or build-up dirt.
Step 2 – Insert the strings into the peg hole and tighten: This is where you need a little agility and strength to get the strings correctly placed into position. Insert the new strings from the bridge area and through the hole in the tuning peg.
Once the new string is placed through the hole, give it a light tug so that the balled end of the string sits snugly against the bridge. Next, on the loose end of the string, leave about 1 inch of allowance* and bend the string 90 degrees upwards against the tuning post.
* The amount of slack is important because it may cause difficulties when you are trying to wind the tuning peg if it is too much or too little.
Step 3 – Wind your strings round the peg with the tuning key: With one finger, hold the bent string in place while you start tightening the tuning peg. I recommend using a guitar tuner or pitching fork to help you get accurate pitching.
* When tuning the high E string, it is best to tighten it slowly to lower the risk of it snapping. Always make sure the area in front of your strings is clear from any body parts. This will prevent injuries in the event that the string snaps.
Step 4 – Retuning and checking for string slippage: It is perfectly normal for new strings to lose their pitching as they require some time to settle in. Once fully tuned, give your strings a tug and recheck the pitching again. In my experience, it usually takes about 7-10 times over a couple of days to get the new strings “seasoned”.
How Often Should You Change Your Strings
 If you are new to the guitar, it is hard to understand certain things. It isn’t like being born, where you learn every little thing one step at a time; there are some things that, if you don’t ask, you will never know.
What’s more, there are some things that are debated even among those who think that they “know” them. After all, many things come down to you and your personal preferences, don’t they?
So how often should you change your guitar strings? Should you wait until they are rusting and starting to go slack? Should you change them once they lose that metallic pinging sound that they make when they are fresh out of a pack? Should you change them every two months, every three months, or every year?
Climate Is A Large Factor
If you live in a humid environment, you will be changing your guitar strings far more frequently than someone who lives in a dry environment. Why? Because weather affects erosion and erosion is what helps you to determine when to change the strings on your guitar.
Don’t feel the need to change your strings once the metallic pinging is gone from them because the metallic pinging is something that you want more than anything else to stretch out of your strings when your first put them on! Yes, that’s right; you don’t want the pinging because it means that the strings are slack, and when guitar strings are slack they tend to slip and your tuning suffers in return.
But this doesn’t mean that you have to change strings when they become rusty or coated in grime. In fact, you could change strings as often as once a week if you have the funds to buy a pack of strings every week. It all depends on your personal preference.
If you prefer the feel of fresh new strings under your fingers, then you can change your strings as much as you like. Likewise, if you prefer your strings a bit worn in, you can wait until your strings are a bit grimy and a bit dirty.
Boiling Your Strings
If you are on a tighter budget, one option is boiling your strings. However, we don’t put too much faith into boiling strings as is usually does more harm than good (creating dead spots, making the strings very, very brittle), so only do this if you have backup strings and your strings are at the end of their proverbial rope.
Coated strings are a great option to help save cash. While they are a bit more expensive, they do tend to last three times as long as normal strings.
If you don’t wipe your guitar strings off after every single playing and practice session, you are helping your strings to erode. Keep your strings clean and they will last longer. As for changing, well, that’s up to you!
Learn to Setup Your Own Guitar Anytime, Anywhere
Learn And Master Guitar Setup & Maintenance is a comprehensive step-by-step video course that shows you how to set up your guitar at home using simple tools. You will be able to save time and money by learning to make your own adjustments for maximum playability and better tone.


Leave A Comment